
How to Connect Salesforce to Google AdWords
Google AdWords campaigns are a powerful tool for keeping your pipeline filled with leads and opportunities. However, you can’t improve on your paid-advertising efforts if you don’t know where the […]
Google AdWords campaigns are a powerful tool for keeping your pipeline filled with leads and opportunities. However, you can’t improve on your paid-advertising efforts if you don’t know where the prospects come from. Connecting your Salesforce to Google AdWords delivers clear attribution, so you know what keywords and campaigns your opportunities are coming from. Use this guide to learn the process of integrating your AdWords conversions into Salesforce leads and opportunities.
Before We Begin
- Log into Salesforce with a system administrator account. In order to make proceed with these changes to Salesforce, you need edit privileges for the following fields: Organization, LeadStatus, OpportunityStage, LeadHistory, Lead, OpportunityFieldHistory and Opportunity. You also need to be able to make custom fields with this account.
- Make sure you have auto-tagging enabled in your AdWords account.
- Log into your Google AdWords account.
- Click the “Gear” menu in the upper-right corner of the screen.
- Choose “Account Settings” and click the “Tracking menu” option.
- Click the “Edit” option in the Auto-tagging section.
- Select “Destination URL Auto-tagging” and
- click “Save Changes.”
- Have permissions to edit your website code.
- Your Salesforce account must allow you to create custom fields and enable field history tracking.
- Have access to Salesforce’s web-to-lead feature, to send lead information from your website into Salesforce Leads object.
Now you’re ready to get started.
Step 1: Salesforce Configuration
Opportunity Object Configuration
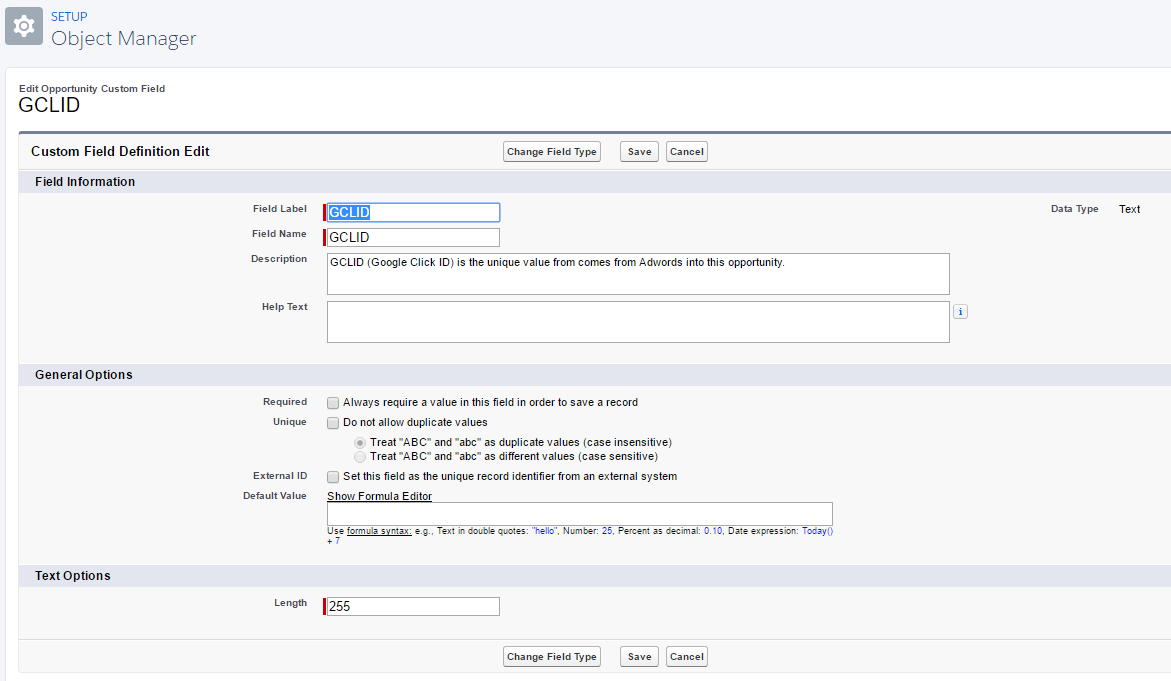
- Go to the Opportunity object in your Salesforce account.
- Make a new custom field named “GCLID” (this stands for Google click ID).
- Create a descriptive label for the field, and expand the length to 255 characters.
- Make sure that “Set History Tracking” is enabled for the “Stage” field. (Instructions can be found here)
Lead Object Configuration
- Go to your Lead object.
- Use the same steps above to make another custom field with identical parameters.
- Click “Map Lead Fields,” and map the Lead.GCLID to the Opportunity.GCLID field (instruction here)
- Click “Save.”
Step 2: Setting Up Your Website
This step will allow your website to save the Google Click ID (“GCLID”) as a cookie and then carry that value to your new GCLID Salesforce field.
Use the following Google-provided JavaScript in the head section on any web pages that have Salesforce lead forms on them.
<script type=”text/javascript”>
function setCookie(name, value, days){
var date = new Date();
date.setTime(date.getTime() + (days*24*60*60*1000));
var expires = “; expires=” + date.toGMTString();
document.cookie = name + “=” + value + expires;
}
function getParam(p){
var match = RegExp(‘[?&]’ + p + ‘=([^&]*)’).exec(window.location.search);
return match && decodeURIComponent(match[1].replace(/\+/g, ‘ ‘));
}
var gclid = getParam(‘gclid’);
if(gclid){
var gclsrc = getParam(‘gclsrc’);
if(!gclsrc || gclsrc.indexOf(‘aw’) !== -1){
setCookie(‘gclid’, gclid, 90);
}
}
</script>
It is recommanded to add this JavaScript code to every webpage. Most content management system (CMS) packages such as WordPress allow you to add this JavaScript into the template once and then the CMS will add it to every webpage.
Create your Salesforce Web-to-Lead Form
- Go back to Salesforce and go to the web-to-lead section in Salesforce and follow the standard process to set up your forms.
- Make sure to include the GCLID lead field in this form.
- Search for the HTML code GCLID: and delete the maxlength and size tags.
- Edit the field type so it is “hidden” rather than “text.” This will make sure that the field does not show up on the form and is rather hidden from the website user.
<input id=”xxxx” name=”xxxx” type=”hidden” />
- Copy and paste this code in between the FORM HTML (<form)>…</form>) tags on your web forms.
- Every webpage that has a Salesforce web-to-lead form must also include this JavaScript between the <head> tags.
<script>
window.onload = function getGclid() {
document.getElementById(“xxxx”).value = (name = new RegExp(‘(?:^|;\\s*)gclid=([^;]*)’).exec(document.cookie)) ?
name.split(“,”)[1] : “”; }
// window.onload() may not be supported by all browsers.
// If you experience problems submitting the GCLID as a
// hidden field, consider using an alternate method to
// call this function on page load.
</script>*Note: The HTML generated by Salesforce will include the ID and you will replace “xxxx” with that id.
Step 3: Configuring Your Google AdWords Account
- Log into your Google AdWords account and click the “Settings” menu in the upper-right corner of the screen.
- Choose the option “Linked Accounts.”
- Go to the Salesforce section and select “View Details.”
- Click the button to add an account, and press the “Continue” button.
- Enter the Salesforce account information, and choose “Set Up Conversions.”
Setting Up Conversions
- Select any boxes in the Milestones section relating to relevant lead and opportunity options that should be tracked as conversions.
- Go to the Conversion column and choose these leads and opportunities from the menu.
- Choose “Create a conversion” and name it.
- Click “Done.”
- Next you will go to “Value”, “Count” and “Conversion Windows” to configure these fields for your sales funnel.
- Choose “Create” and pick the best import schedule for your team.
- Save your changes.
Now your AdWords conversion data automatically imports into your Salesforce.
Sources:
https://support.google.com/adwords/answer/6299296
https://help.salesforce.com/articleView?id=setting_up_web-to-lead.htm&type=0https://help.salesforce.com/articleView?id=tracking_field_history_for_standard_objects.htm&type=0
https://support.google.com/adwords/answer/3095550
http://searchengineland.com/adwords-conversion-import-salesforce-launch-251234
GA Connector is the integration we’ve been waiting for
We’ve gone through the not-so-easy manual process of connecting Salesforce and Google AdWords data, so we were thrilled to discover GA Connector — this tool allows you to easily and seamlessly sync your sales and marketing data so you can focus on running successful campaigns. If you’re interested in integrating your sales and marketing data, check out our five reasons why should connect your Salesforce and Google AdWords data with GA Connector.
Also published on Medium.
Share article
— Related Articles —
Related Posts


— Also on Galvin Tech —
Also published on Medium.